Showing posts with label Scenery. Show all posts

Friday, 13 December 2024

Scenery in the Ravine Part 2

Somehow I missed taking some progress shots on this module. But here is where it's landed for now. I completed the static grassing and added many of the conifer trees from the old layout. I also added a couple of my redwood trees on the edge of the module as the next module to be built will introduce the redwood forest. 

The river is to have gravel and water added, and I plan to add some light foliage to the nooks and crannies on the gorge cliffs. Of course, the steel viaduct is still to be completed, but for now, the plywood bridge has been painted brown as a stand-in.  


Friday, 15 November 2024

Static grass Part 1

This post shows the progress of adding static grass to the yard and town modules. I am using a mixture of Noch, Silfor and Woodland Scenics static grass. My static grass applicator was from AliExpress, and works really well. I haven't tested any of the more expensive models from Woodland Scenics and Noch, but I'm not sure that their results would necessarily justify the increased price. 

I particularly like the results of the patchy grass around the team and stockyard tracks, which are buried in the ground. The tufts don't interfer with the rolling stock and adds to the overall look of the scene. 


Friday, 18 October 2024

Scenery in the Ravine Part 1

The last time I posted about the ravine scenery the rocks were all still plain white plaster. I painted these using the woodland scenic 'leopard spot' technique. Except, I just use cheap acrylic earth tone paints instead of the Woodland Scenics colours. I make up thin washes of each colour and spot them around, making sure to leave sufficient patches of plain plaster. Then this is all tied together with a wash of the colour that you want to use as your dominant colour. For this I used a black wash, yielding a dark grey colour. If any colours appear too intense I hit it with some wet water from a spray bottle.

These photos show the rock faces while they are still a bit damp. Once they are completely dry I'll dry brush the faces to bring out the highlights and help blend the different colours together. 


Friday, 4 October 2024

Stockyard fences part 2

With the fences repainted I installed these on the layout. The stockyard sits at the edge of the layout, allowing the viewer to look out of the yards to the loading of the stockcars. I drilled an appropriate-sized hole for the posts and simply inserted the fences into the ground. Later on, static grass will help blend the fences into the surrounding scenery.  The loading ramps are also salvaged from the previous layout. They were 3d printed by another New Zealand-based modeller. 


Friday, 23 August 2024

Stone Roundhouse Scratchbuild Part 2


After building the side wall, I made a cardboard wall template for the front and far wall of the Roundhouse. Test fitting the template on the layout was important and I snapped a few photos below. Even the bare walls give a good impression of how the structure is going to change this whole scene. 

To make sure the clay dried at the correct angles for the front of the roundhouse I created a jig from plywood. I laid out a sheet of paper, took a rubbing with the pencil of the location of all the roundhouse tracks and then plotted the front wall of the roundhouse on the paper. The paper was then placed on some scrap plywood and cut out with a jigsaw. I cut two bits of plywood and spaced them out with scrap wood. Finally, I used Mod Podge to glue the cardboard wall template to the jig so that when the clay dries it will not pull the cardboard away from the jig. 


I'm looking forward to seeing this scene come to life as the project progresses.


The cardboard wall glued to the plywood jig


Friday, 14 June 2024

Backdrop part 1

With a few nerves, I decided to scrub in a mountain horizon. I had several landscape photographs in front of me at the time which seemed to help with coming up with a skyline I was happy with. I then scrubbed in the foreground hills. Once dry, both colours appeared too dark. I decided to carry on and see what snow and highlights on the foreground hills would like. In doing so I discovered I'd made a mistake. When I painted the practice board I did each side in one sitting. It was small and the base layer of paint was still damp when you layered on the snow and highlights. This meant the palette knife could mix and blend the colours and create nice transitions. I found trying to smear white paint onto the dry base colour seemed to yield a pretty flat and lifeless scene. 

Given I wasn't happy with the colours anyway I decided to try again and this time, rather than try and do the whole vista at once, I will work in smaller sections. I feel more confident doing this as I have worked out a good recipe for a new mountain background colour. More about that in a future post. 


Before...

After scrubbing in the mountain and foreground hill base colours. 

Looking the other way. I decided both colours were too dark. 

Experimenting with adding snow and definition to the scene.
I decided to paint over this with a lighter base colour and start again. However, even this first attempt demonstrates what an improvement even a basic backdrop can make to a scene. 


Friday, 31 May 2024

Rock castings part 2

 The ravine module required plenty of rock castings. I enjoy dramatic rocky mountain scenery and this module has been designed to show off little trains among big rock features. 

Using my Woodland Scenic rock moulds I spent several sunny afternoons churning out rock castings of all varieties. I'm not the biggest fan of jigsaw puzzles and fitting them together can be a bit of work. When I place duplicate castings close to each other I try to place one upside down to create more variation. I do like the Woodland Scenics moulds. But more than once I wondered if they could have been made in standard sizes so they could all fit together more neatly. I guess this would risk making them look too uniform and most people probably use the moulds to create small cliffs and outcrops rather than deep ravines. 

I realised that I didn't have as much clearance between the cliff and the rails where they emerge from the tunnel. The tunnel face in particular was a bit close to the edge of the module. I didn't have a rock casting thin enough that would work here. So, inspired by my earlier attempts at rock carving, I covered the foam in a thick layer of plaster and as it set up I carved it with my pick and a craft knife. I had several attempts and had to fill in some areas with more plaster, but overall I was pleased with the results. After getting onto my second 5kg bag of plaster, I started to worry that too many castings would make this module heavier than I wanted. So I used this same carving technique for all the rocks on the left side of the ravine above the rails as it didn't call for as much plaster as individual castings. This also gave a nice seamless corner where the two cliff faces meet. 

After completing the left side I ran out of inspiration and left it for a few weeks. But when I returned to it I found the right-hand side went much faster than I expected. I used a little plastic palette knife to plaster over the gaps between the moulds. I then used my carving techniques to blend the textures between the castings. 

I removed the temporary plywood bridge and then cut a single span of plywood just narrower than the railroad ties and painted it brown. It supports the track nicely and gives a mocked-up look of what a girder bridge may look like. I used some scrap bits of metal to mock up where the steel viaduct supports. Because I need a solid place to build foundations for my steel viaduct supports I used some large castings to make an uneroded island in the middle of the river. At present it looks quite round due to the shape of the castings, but I will work it into more of a teardrop shape with rocks and gravel to model the sediment deposits that build up behind solid objects in the river flow. 

Yellow foam ravine. Not very scenic just yet. 

In this photo, the left side of the ravine is finished.
The rocks from the rail upwards were carved by hand.
My experiment with the large backdrop is in the background. 

The castings for the right side of the ravine being fit together before
blending the castings together with more plaster. 

The completely 'rocked' ravine, including an island
in the middle of the river.

The initial temporary bridge was replaced with a narrow piece of plywood, painted brown to blend in. The thin bits of scrap metal mock up where the viaducts steel supports may be planted. 

Right now the rocky island looks quite round. I'll extend it to more
of a teardrop shape using other scenery materials later on. 


Friday, 17 May 2024

Backdrop practice

 I enjoyed painting the backdrop for the last layout. Chris Lyon's videos on YouTube were super helpful and gave me the courage to give backdrop painting a go. 

This time I wanted to improve the look of my mountains and found some videos about painting mountains with a palette knife. I found a long piece of scrap 3mm MDF and started to paint. I started with just half the board and finished a scene. Then another day I tried to fill in the other side of the board and varying my technique. I found the palette knife technique helpful for giving texture and shape to the mountains. A brush smoothes things out too much. 

The next step will be to upscale and try and translate my learnings onto the larger canvas of the module backdrops. I am aiming for a higher horizon line. This gives the effect of the hills and mountains being closer rather than too distant. I feel a low horizon line makes me feel like I am looking down on the scene from a 'drone point of view'. A high horizon line will give the viewer the impression they are really in the scene looking up a the mountains. After all, I am trying to recreate the feel of mountain railroading and my line is set in the heart of the mountains. 

An aerial view of the practice board as a work in progress. 

The completed scene on the right hand side of the practice board.
I didn't give much thought to composition rules. But the lake would look a little
better if it was slightly more to the left. 

The completed mountains on the left side of the board before adding the foreground. 

The completed scene propped up against the module backdrop. The first attempt at scrubbing in the outline of the mountains on the module can be seen behind it. 


Friday, 3 May 2024

Rock casting part 1

After ballasting the yard I made a start in casting rocks. I needed plenty and use the Woodland Scenics rock moulds. The plaster that I had on hand seemed to do fine when mixed with my ground cover dirt, but the rock castings I made with it had a chalky texture. I wondered if it had been sitting too long. I discovered this after painting and staining the first rock moulds I had fitted to the hillside above the town where a lot of the detail sadly got washed out. They looked quite featureless and dull. I bought some new plaster, which fixed the problem going forward. 

I thought I would have to pull out the failed castings and refit and shape new ones. But before I did that I thought about carving the old castings to see if I could put more detail into them. I hacked and chipped away at the castings using a pick and a craft knife. They didn't look too bad at all, so I decided to leave them in place. This gave me the confidence to try carving rocks on another part of the layout, so it was worth experimenting with. 

The rock castings before blending them together and painting. 


The final result after carving the castings and painting. 


Saturday, 20 April 2024

Modelling crowned ballast


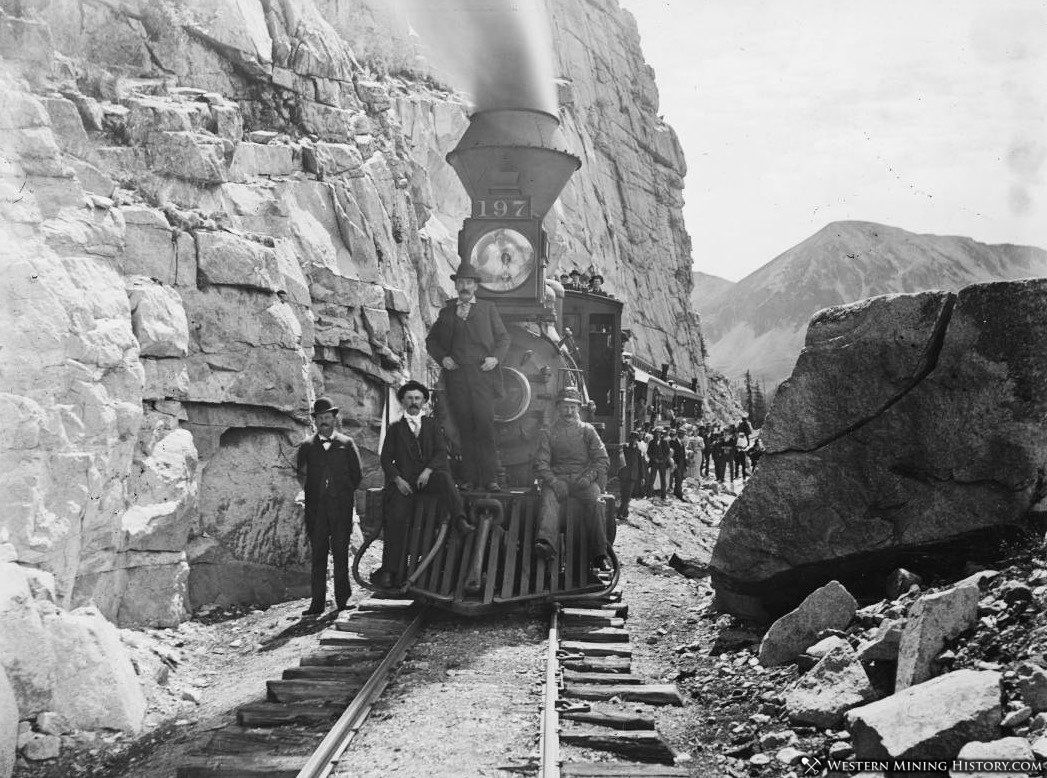
Most of the ballasting so far has been in the yards. But I have done a short section of the mainline. I'm modelling an old technique for ballasting the track used before the turn of the century called crowned ballast. instead of nestling nicely between the ties the ballast is heaped up in a pile down the centre between the two rails. Like a crown on a modern road, the crowned ballast was supposed to help water drain away efficiently. Apparently, it kept settling over time and the jury was out on whether or not it improved drainage. So the practice was eventually abandoned. Another interesting quirk of modelling railroads at the turn of the 19th century. 

The crowned ballast has settled between the rails in this photo of
locomotive 197 on the old South Park Line circa 1895 

The ballast on the track in the right has more of a crown to it.

Ballasted mainline as we are familiar with it. No ballast on top of the ties.

The mainline with a crowned ballast running down the centre between rails.


Friday, 23 February 2024

Ballast, cinders and ashes

After painting and dirt texturing, the last layer (before greenery) was the ballast. Because I'm modelling an engine servicing facility, I wanted to add some ashes around the yard. I know railroads often ballasted yard tracks with cinders as they had plenty of them. But I also wasn't sure how it would look, I didn't want the whole yard to be dominated by the dark cinders. I added cinders in front of the roundhouse tracks, and the ends of the turntable approach tracks, with some spilling over into the turntable pit. I also added some to the caboose track (foreground closest to layout edge) and the Maintenance of Way train track (rear beside the coaling tower). 

The layout ballast is a mix of woodland scenic fine buff and a little fine brown ballast. I also added some buff ballast from a New Zealand scenic material company (Scenic Textures). Their buff colour dried a little too much like a light grey for my liking. 

I misted wet water over the layout and glued down the ballast with scenic cement (Mod Podge and water 1:3 ratio). Because there is such a large area being ballasted in the yard and there were so many switches to be mindful of, it took me several attempts to make sure I had glued everything down. 

I'm modelling a different style of ballasting on my main line, which I'll cover in a future post. 


The ballast in place before gluing down with Mod Podge. It dries every so slightly darker. 

Again, ballast on the left before glueing. But this shot gives a good view of the buried team
and stockyard tracks. 


Friday, 16 February 2024

Earth texturing begins

After covering the hill forms in a thin layer of coloured plaster I began adding the scenery on the first two modules by painting an earth-coloured paint on the modules. The next step was to add layers of dirt. 

Getting a colour that I was happy with was challenging. On my holiday I harvested some dirt from the area we visited that was close to what I wanted on my layout. I put it through my blender for making scenery materials and then screened it for various grades. The finest was a nice dusty dirt powder. Of course, natural materials always go darker when glued down. So I experimented with adding plaster to the dirt until I found a result that I liked. 

In the area around my team track and stockyard, I wanted the rails to be buried in the dirt. I've always loved the look of the buried track, but have not often seen it modelled. I couldn't find any good articles about how to create this effect, so if you can point to any I'd be interested. 

I used some masking tape to cover the inside of the rails and the rail head. I wanted the painted rail side to be visible after and not just a plastery mess. Then I mixed up some more batches of my dirt and plaster and spread it under the tracks, then pressed the tracks down into the mixture. The plaster/dirt mix oozed up between the ties and I used a large flat pain scraper to add more of the mix from the top and smooth it all out. 

As the mixture dried I found it cracked revealing the presence of the ties underneath. As the mixture dried I sifted more of the dirt onto the area, brushing and pushing it into the cracks. Once the base looked about right, I sifted on a final layer of dirt mixture through an old stocking. 

The cracking was probably because the ratio of plaster to dirt is a bit low, but it held together well. But it wasn't working "zip texturing application" of the final dirt layer. Zip texturing is where the plaster, usually mixed with powder paints, sets up hard and is enough to hold the scenery in place. I had to mist on some scenery cement (I used Mod Podge and water in a 1:3 ratio) to set everything up nicely. 

Earth-coloured paint was applied to the ground surfaces (those are stray small rocks not paint drips!)


The dirt mixture, still damp, shows signs of cracking around the buried tracks. 

Dirt spread around the yard area, with tracks masked off so they can be ballasted later. Dark areas are where the dirt application is thicker and takes longer to dry. 

Another view of the buried tracks. The area in the foreground will be a street and is here awaiting texturing.


Friday, 2 February 2024

Painting the rails

Painting the rails really helps our trackwork look a lot closer to the prototype. Painting the rail seems somehow to lower the visual profile of the rails. Even code 100 rail that has been painted (and then ballasted), like on the first version of my Thoroughfare Gap Railroad seems to look pretty good. 

There are different products available like rail paint markers and other things that can help with this task. But I used a simple can of Rustoleum camouflage brown spray paint, which I found worked great on the last layout. This gives a nice matte dark brown.

I covered the toe of each of the switches with a little masking tape to help preserve electrical contact later. After spray painting and the tape was removed I used a little of the paint on a brush to touch up the outside edges of the stock rail. Painting the turntable pit rail was tricky. But I managed to mask off the bridge and stone walls and work my way around with the spray can. 

I dry-brushed the ties with a tan earth colour acrylic paint. This dulled down the solid colour and created some variation by bringing out the moulded texture in the ties. I'd forgotten that ballasting also weathers the ties, so I'm not sure if dry brushing the ties was an unnecessary step, but I guess it means that all the ties have received a similar treatment. 

I did think about varying the tie colour by hand painting every few ties a different shade of brown, but decided against it for now. Perhaps I'll try that out on another module sometime. 


The yard looks better already with the rails painted. 

The foreground track has been dry-brushed. The plain spray-painted tracks behind do have a flatter look to them.

An overhead view of the difference between a plain spray-painted track (top) and one that has also been dry brushed (bottom).


Friday, 15 December 2023

Landscaping

The last few weeks of railroad work sessions have focused on building the hill and mountain formations spanning two modules. I like large imposing landscapes with small trains running through them. But I do want the terrain to look realistic like it was there before someone decided to put a railroad through it. 

I've made the land formations out of extruded foam, cutting and shaping it with a craft knife. A hot wire foam cutter would have been useful but I got to where I wanted to go with the knife. The terrain functions as a view block between the town and yard from the rest of the modules. As the line exits the tunnel, it crosses a deep ravine that has been carved out by a river. I've purposefully tried to make the scene deeper than it is by making the river turn behind the hill. As always, a painted backdrop will help. This ravine will require quite a few rock castings. I also have to settle on the design of the bridge for the gap. I'll another post looking at different options. 

The next step is to add a thin layer of earth-coloured plaster over the hill, to fill out any humps and bumps, and then I can get to work applying scenery. 

The hill formation separating the yard and town from the rest of the layout.


I've made a section removable for access to the tunnel. 

...with the access hatch removed.

The deep ravine module on the other side of the tunnel.

Now I have to decide what sort of bridge to build here...

The river winds its way around the corner, hopefully adding some intrigue.