Monday 25 December 2023

Merry Christmas from New Zealand

Merry Christmas to you from New Zealand, or as we say in Te Reo Māori (the Māori language): 

Meri Kirihimete!

It's summer here, and the Christmas season here is traditionally a time to gather with friends and whānau (family) around the BBQ and head to the beach or lakes for some quality time in the sun and sand. Given so many of the traditional images of Christmas come from the northern hemisphere, we like to call ours an 'upside down Christmas'. 

Wherever you are in the world, thank you for following along on my blog. I hope you continue to find something here of use or interest in the coming year. 

I'll resume posting sometime in January. Until then, and regardless of whether or not the birth of Christ is something you celebrate, I pray you find peace and reconciliation where it's needed during this festive season.

Many blessings,

Luke

Image courtesy of Bible Project video: The Birth of Jesus: Luke 1-2


Friday 15 December 2023

Landscaping

The last few weeks of railroad work sessions have focused on building the hill and mountain formations spanning two modules. I like large imposing landscapes with small trains running through them. But I do want the terrain to look realistic like it was there before someone decided to put a railroad through it. 

I've made the land formations out of extruded foam, cutting and shaping it with a craft knife. A hot wire foam cutter would have been useful but I got to where I wanted to go with the knife. The terrain functions as a view block between the town and yard from the rest of the modules. As the line exits the tunnel, it crosses a deep ravine that has been carved out by a river. I've purposefully tried to make the scene deeper than it is by making the river turn behind the hill. As always, a painted backdrop will help. This ravine will require quite a few rock castings. I also have to settle on the design of the bridge for the gap. I'll another post looking at different options. 

The next step is to add a thin layer of earth-coloured plaster over the hill, to fill out any humps and bumps, and then I can get to work applying scenery. 

The hill formation separating the yard and town from the rest of the layout.


I've made a section removable for access to the tunnel. 

...with the access hatch removed.

The deep ravine module on the other side of the tunnel.

Now I have to decide what sort of bridge to build here...

The river winds its way around the corner, hopefully adding some intrigue.


Friday 8 December 2023

Turntable build part 5

I used balsa wood to make the wooden decking for the turntable. The method I find successful is to scribe the balsa with a clutch or mechanical pencil. The lead carves a groove in the balsa and also darkens the groove with the graphite tip. To weather the wood I mix a little Indian ink with water and brush it on as a wash. 

The decking also has cross beams underneath. These don't go all the way through, as you'll see from previous blog posts. However, you can't tell by looking at the turntable from the trackside, as it's impossible to see under the decking. 

I added two pushing poles. I'd contemplated making a planked pathway around the top of the turntable pit and glueing a couple of figures in a pushing stance to the pushing poles, but I think I may just add them for photos instead. 

The turntable is now pretty much complete. The pit rails need to be painted, and the pit needs some scenery, but I will do this when I add the scenery to the rest of the module. 

There's a video of the turntable in action on my YouTube channel, which is embedded below.

If you've been following along with this build, thanks for your interest and comments. 

The decking sides in place before weathering. 

Weathering the deck with Indian ink. 

The completed turntable with pushing bars


Friday 24 November 2023

A Train Robbery - Diorama update

A while back I made several posts about a diorama I'd been making for my Dad based on the opening scene of the film The Assassination of Jesse James by the coward Robert Ford. The diorama was finished scenery-wise and in residence on my Dad's shelf however, the lights from the special effects lighting did not provide a good nighttime atmosphere.

I used about 20cm of LED strip lights and painted them blue with Tamiya clear blue paint. This allows the light to shine through and changes the colour of the light. I use this technique a lot to get the right colour for oil lamps (using Tamiya clear orange). I connected up the LED strip to a spare port in the wiring harness and we were done. I think the blue light is enough to give off an atmosphere of a moonlit night and it means that the diorama isn't so dark that you can't see the details. 


The diorama before the lights

After adding the blue-tinted LEDs


Friday 10 November 2023

Century of steam

 A little while ago this video popped up in my YouTube algorithm. There aren't many steam locomotive simulator games on the market, and I've never seen one that has targeted turn-of-the-century railroading like this title is. 

The game is called Century of Steam by Studio 346. It's still in development, but as far as I'm concerned, it looks gorgeous. The developers have said that the footage in the video is all in-game footage, and none of the shots are cutscenes. 

If you enjoy the trailer, be sure to check out some of the other videos on their channel showcasing the game in more detail. I don't think any of my computers will have the specs to run this game at the moment. But I'll be watching it with interest. Enjoy.


Friday 3 November 2023

Turntable build part 4

The more I've been using my new modules the more I felt I wanted to be able to move the turntable without reaching into the scene. I didn't want a motorised solution. I like turning things by hand, which really is in keeping with the time period I model. I hadn't been able to find a hand crank system for a turntable so in the end I plucked the courage to build my own. 

I found some plastic gears on Aliexpress and picked up some brass rods from my local hardware store. I ordered two sizes of gears and the slightly smaller one looked like it would do the trick. However, I needed a solution for attaching the gear to the rod, which would be the turntable spindle. I had some Meccano that my kids don't really play with. So I used one of the collars and used small bolts to attach the gear to the collar, which is attached to the brass rod (see photo).

I made up a plywood box to house the gearing from scrap ply. The brass inserts from electrical connectors held the wormgears in place on the rod. For the crank wheel, I used my largest hole saw to cut a hole in the edge of the layout, I used the cutout as the crank wheel, which is attached to the rod with grub screws. A scrap piece of metal was spruced up for the handle. 

Overall, I'm pleased with the performance. The turntable moves nicely and slowly. I may have to refine a few things as the crank wheel is a little snug in the hole in the layout edge. But, for now, it is working and looks pretty good. 

The next thing for the turntable will be to work on the decking and details, followed by some scenery in the pit. 

Doesn't look like much but its the beginnings of a hand crank system. 
The large gear is on the turntable spindle. The worm is on the hand crank. I added a bottom plate to prevent the turntable spindle from flexing when turning. 

The completed hand crank at the layout's edge. The crank can be removed for transport. 


Friday 27 October 2023

Whistle signals

There's nothing like the sound of a steam whistle. The familiar sound of two long blasts, a short blast and one final long blast on the whistle for a grade or level crossing is engrained in the sub-conscience of many railfans. We just know that signal means a train is coming and we need to stay out of the way. 
Sound decoders have brought so much life to our models and many include a feature to emulate this distinctive whistle sequence with a single button push if you don't feel like playing the whistle yourself. 

Some time ago I was reading an excellent book on the turn of the 19th-century railroading by an engineer, Joseph Bromley called "Clear the tracks". The book is Bromley's memoir of his career as a railroadman. He started as a wiper in the engine house and worked his way up to his position of a senior engineer on the Delaware, Lackawanna & Western railroad. In one chapter, Bromley recalls a terrible grade crossing accident he was involved in at a crossing with poor visibility. A horse and buggy didn't see his train and the two occupants, and the horses were tragically killed in the accident. 

Bromley was obviously extremely affected by the incident but noted he was convinced he had blown the required whistle signal of two long blasts and two short blasts. The rest of the story is fascinating, including how he was apprehended by the townsfolk, subjected to a mob justice trial and was lucky to escape with his life. However, I was intrigued by Bromley's record of the appropriate whistle signal, which is different from the signal used on American railroads today. I wanted to know if this was just a whistle format peculiar to Bromley's railroad, or if it was widely used. Furthermore, if it was a standard signal, at what point did it change to the format we know today? 

A few years back I asked a question on the Early Rail forum over at the Railroad Line forums and found the community there really helpful. By referring to a variety of railroad rule books from the period, the modellers there determined that Bromley's two long and two short blasts were indeed likely a universal grade crossing signal, at least by the 1880s. Judging by later rule books, it seemed to remain this way until some time during the 1920s, which was later than I expected. 

Other whistle signals appear to have remained the same. However, in days before the widespread use of airbrakes, the one short blast for stopping was used to signal to the brakemen to apply the handbrakes on the cars.

The rule books the forum members posted on the thread make for interesting reading.  If I'm feeling operating authentically, I use the two long and two short blasts for the grade crossings. However, this isn't always the case. I still use the modern signal if I feel like it, it does have that familiarity about it. 

Overall, this was an interesting delve into railroading history. Just another example of why turn-of-the-century railroading can be such a rewarding and fascinating hobby.

Paragraph 349 of the Standard Code of the American Railway Association 1897 contains the required grade crossing whistle signal. Two long, followed by two short blasts. ___ ___ _ _


Friday 20 October 2023

Turntable build part 3

Next, I laid seven roundhouse tracks. I've only got six locomotives, but you never know. While I don't have the appetite or the budget at the moment for another locomotive, perhaps one day someone will release a really nice turn-of-the-century locomotive (I wouldn't mind an 1870-80s wagon top boiler ten-wheeler with a balloon stack). Truth be told there will be my two-stall enginehouse at the other end of the layout, so in fact there will be storage space for three extra locomotives, but that's academic right now. There's an overhead photo below showing the outline of where the roundhouse walls will go when I get around to building those (planning for a stone roundhouse). 

I've put in an overshoot track so all tracks coming from the yard have something on the other side of the turntable. Since the photos below were taken I've trimmed the overshoot track a little. The overshoot track is also wired with power in case locomotive pickups are on the overshoot.

As the track work was coming together I made a few compromises and changes from the original plan. The photos show the coaling tower closest to the turntable with the MoW track extending behind. In theory, I could spot a coal gondola there to service the tower. However, I've since trimmed the MoW track and placed the water tower closest to the turntable. It feels a little less cluttered and while that means I can't spot a coal gondola behind the tower, I think that will be secondary overall to the general feel of the scene. 

The second compromise was the caboose track. I really didn't want anything in front of the turntable to block the view. But in the end, this was the only space/most logical space I could think of for the cabeese. In reality, there should only be a few cabeese on this track at a time, which shouldn't block the view too much, and may add some foreground interest once the roundhouse is built. I've placed the track heading off the edge of the layout, hopefully giving the impression there is more to the track than is shown on the scene. In theory, it could serve as an attachment point in the future if I ever needed to attach a module there.

Coming up next I'm looking to build my own hand crank mechanism for rotating the turntable without reaching into the scene.


The caboose track has a pin to prevent cars from rolling off the layout. But I liked the idea of a track disappearing 'off layout'. 

The red line roughly marks the walls for the roundhouse that will need to be scratchbuilt.

A general view of the yard.


Friday 13 October 2023

Miniatures


If you're familiar with this blog then you will have read of the miniature painting talents of my father who has painted all the figures for the railroad. I wanted to share some photos of other scale figures he painted from the American Civil War and Native American Wars.

I'm always impressed by the level of detail he is able to bring out through his painting methods. In particular, I think the eyes are able to convey so much emotion and drama. 

I hope you enjoy this selection of photos of his miniatures as much as I do.


Friday 29 September 2023

Turntable build part 2

I wasn't sure about the best way to model the edge of the turntable pit wall and had thought about printing out a stone or brick pattern and lining the edge with it. But I decided I wanted something with more texture so I tried carving stone work into DAS air dry modelling clay. The results were lacking, but perhaps with some practice, I could make it work. But I tried carving, or rather scoring, some extruded foam. I was quite happy with the look. To paint it, I started by painting individual bricks either grey, raw or burnt sienna or raw number, which looked awful at first. I then dry-brushed white over all the stones, which tied everything together a bit more. But the final black wash toned everything down and gave a cohesive look to the masonry, as well as providing shadows in the mortar lines. 

To make the pit rail I began by measuring the length of rail I'd need and cut a piece of flex track half that length, then cut the ties in half, so I had two halves of the pit rail. I slowly bent these to shape by hand and used a steel weight as a jig. I kept checking the curve against a circle drawn with a compass to make sure I had the right profile. Once it was close enough, I glued the rail and ties down and ran wires to the main layout bus. 

Then it was a battle of slowly aligning the approach tracks. I worked with one track at a time, leaving a little extra length, that I trimmed once the glue had set. Before I begin the scenery at large, I will paint all the rails and ties. 

The turntable is reasonably short for my biggest locomotives like the 4-6-0. Overshoot tracks will be needed opposite all approach tracks and a real-life crew may have fun trying to balance the table with a larger engine. However, I was aiming to depict a turntable that was possibly struggling to keep up with the development in locomotive technology. With new locomotives getting bigger rapidly railroads were constantly having to update infrastructure to cope. 

The painted foam stonework glued in place. 

The bridge in place. The girders are glued in place. Decking and details to come.

An overall view of the turntable and the approach tracks glued down. The two tracks at the left have screws temporarily keeping the track in place while the glue sets. 


Friday 15 September 2023

Locomotive bell and whistle cords

This is a post I drafted last year, which, for some reason, I never published at the time:

Sometimes it's hard to know whether or not to model things like wires, or rope. From a scale perspective, often rope and wire will end up being larger than scale. At the same time, often when your mind expects to see the detail or wire or rope in a certain spot, it can look strange if it is missing. 

When completing some warbird aeroplane models with my son, we added the radio wires. I was really happy with how they finished off the models and I think they photograph better than they do without them. This got me thinking about such features on my layout, the obvious candidates being bell and whistle cords on the locomotives. I've also been keen to model a single telegraph wire along the line between stations for Morse code. But that's a project for another day.

As an experiment during my upgrades of the Jupiter, I added a bell cord and a metal whistle lever. I was pleased with the results and decided these details to the rest of the roster. 

I used the same method as I did for the radio wires on the planes, using simple grey cotton thread for the cord. However, as it comes, the cord is not stiff enough and does not have a realistic sag to it to emulate the way a full-scale cord would hang. 

However, if you run the cotton between a bit of PVA glue on your fingers it stiffens the thread up. While the thread is drying, attach a clothes peg to the bottom of the thread and hang it to dry.  This keeps it nice and straight. Afterwards, it won't curl when you cut to length and will be stiff. 

I cut the thread into lengths long enough to have a realistic sag to it and then attached them to the models. The thread now could be bent to the shape of a saving bell or whistle cord.

Overall, I'm quite happy with the results.

A 1/72 Scale Junkers JU88 I made up with my son, featuring a radio aerial wire, which gave the idea for using the same method for bell and whistle cords.


The bell cord and whistle lever are visible in this photo of the Jupiter, taken on the old Thoroughfare Gap layout.


Friday 1 September 2023

Joining modules

Aligning layout modules seems to be a pretty important thing if you want trains to be derailment-free across the joins. I started by joining the modules together using 8mm bolts and T-nuts in the module faceplates. The T-nuts on one end of each module have the threads drilled out so the bolt tightens the two modules up against each other. I'd thought that this would be accurate enough, but I noticed after taking two of the modules apart that there was a tiny little bit of play. I managed to line things up manually and then tighten the bolts. But I think I will drill some holes and add some alignment dowels to help in the future. It is not like I'm pulling the layout apart a lot. It's a home layout designed to move instead of a dedicated show layout that moves all the time.  

The other thing about the 8mm joining bolts is that each T-nut is part of the wiring bus, having a positive or negative bus wire soldered to it. So when the bolts are in place, they carry the power between the modules, meaning I don't have to worry about wires hanging down or making other connections. 

To keep the rails aligned, I've also glued small brass plates at the end of each module and soldered the rails to them. I've seen people use PCB for this purpose, but I don't have access to a reasonably priced supply, so I used brass sheet, of course making sure I cut the plate in half after soldering and glueing to prevent short circuits. So far this is working well. All my trains are crossing all the module joins nicely and smoothly. Hopefully, once the rail and ties are painted and ballasted the plates should blend in much better than they do right now.

Brass end plates where the modules meet.


Friday 18 August 2023

Turntable build part 1

I've been slowly chipping away at my turntable build. I had two turntables on my previous layout. One was a wooden gallows turntable, which I'm keeping for the town that will feature at the other end of the new modular railroad. However, I wasn't happy with the turntable that used to be placed at Erewhon on the old layout, mainly because it was mainly a freelance design as I hadn't seen any photos from the turn of the 19th century with anything that looked close. 

Earlier this year we visited the Pleasant Point Railway, which is not far from Timaru and one of the attractions was helping turn a rail-motor car on the turntable, which had a pit, with the turntable bridge being the more conventional design with the girders underneath the track. I decided to model something similar and found some prototype pictures of turntables from the period to give me something to base it on loosely. 

Northern Pacific Railroad roundhouse at Lester, circa 1910

‘Colorado Midland Engine 20 on turntable’

My turntable bridge was made from a piece of 20mm plywood. I carefully measured, cut and centred a bit of straight set-track. I reused the girders from the previous turntable. I will glue them on later, presently they are just resting in place for the photo. I've had a go at carving masonry blocks into insulation foam for the turntable pit wall. I'm pleased with how it turned out. The next step will be to paint the stonework and then glue it into place. Then I can lay the pit rails to power the turntable. The last thing will be to add decking, made from strip wood and balsa to the turntable bridge. 


I am considering adding a hand crank to rotate the turntable. My main concern will be to ensure it is geared low enough to be easy to turn and accurate enough to align manually. I may just settle on turning the bridge by hand. But I would like to watch the table turn around, seemingly by itself. 

Saturday 12 August 2023

Modular layout update

I've been making some progress with the modules. I've now got four modules built and the track laid. The yard, took the most effort as all the yard tracks straddle two modules.


After laying the track, I made a temporary connecting module between the old layout and the new modules. With everything wired up, I now can run trains again, as I have a yard to store all my rolling stock, and build and stage trains. 

I will keep working on the turntable, which I've been building from scratch, and then the Roundhouse and Caboose tracks. That will pretty much cover all the track work for the time being until I build more modules. Then perhaps I can start to develop the backdrop and scenery plan further. 


The fourth module will feature a canyon with mountains rising high above the tracks.

The yard looks reasonably busy already. 

To mark the joining of the rails, Jupiter and 119 met at the boundary of the old and the new layouts.


Monday 10 July 2023

Modular layout trackplan

Funny how these things go. I meant to make this post a month and a half ago, but time somehow gets away from one so. 

I've been using the free version of AnyRail to design the layout for the modules. The area on each module for track laying is 550mm x 1200mm. 

As always there are some compromises in any track plan. 

Some things I wanted to achieve:
  • I really like point-to-point operations, 
  • I prefer not to handle the locomotives, so turntables and engine houses are required.
  • Trains up to 1.45 meters long (two locomotives and 6 passenger cars) need to be accommodated.
  • Yard tracks need to be double-ended (for locomotives to escape).
  • All rolling stock must be able to be stored on the layout, including:
    • A caboose track for storing cabeese.
    • Maintenance of way equipment track.
  • To achieve the above and save space, I'm happy with a non-prototype, fiddle-yard track design at one end. Although, this will still be finished with scenery.
  • The track must be mostly level across all modules, save for small changes between different sorts of tracks. The scenery will rise above and drop below the tracks on some modules to give a sense of the landscape.
  • I want several modules to just feature a single track and large landscapes.
  • Two types of bridges, one of which should be a timber trestle.
  • At least one tunnel. (The previous layout used a lot of tunnels and I want to reduce the level of hidden trackage).
  • I want a passing siding between the two towns for meets. This is a location to include the large redwood trees and some industries like the sawmill and mine.
  • Provisions for locomotive servicing at each end. 
 
The design below is what I've come up with so far. The benchwork for the four modules along the top of the picture has been constructed and after laying out the printed track plan and testing the space with my rolling stock, I've started laying track for the yard area. The modules along the right side of the picture and bottom, are a concept only and will be constructed in the future. 

Any tips, suggestions or comments on the track plan are welcome, so feel free to leave a comment. I'll endeavour to reply


Sunday 2 April 2023

New modular layout benchwork

I've started chipping away on the construction of my new layout modules that will connect up with the part of the old layout I brought with me. I settled on the modules being 1200mm long x 600mm deep. 

I contemplated doing something similar to  FreeMo style modules without a backdrop. But then I found this idea from a user on the MRH forums and I decided I did really want a backdrop and in built lighting. This way, when the layout moves again, each module can be packed up relatively easily and transported as is. Maybe, I may even be able to take the modules to a train show one day. 

I've got room to build five modules in my current space. I'll share a track plan in a future post, but the priority is to build a yard area with enough capacity for all my rolling stock and locomotives, so I don't have to have any off layout storage. That way I can run trains in a point to point manner, as I did on the old Thoroughfare Gap Railroad. I'm hoping to have a roundhouse, which will be a new addition. That would go nicely with one of my turntables and engine servicing facilities. 

I've decided to minimise the grades on the layout to maximise the pulling power of the little 4-4-0's, which always tended to struggle with the steep grades on the old Thoroughfare Gap layout. That doesn't mean I won't have any dramatic scenery though. While the track height will remain mostly the same, the scenery in some modules will extend for some distance above and below the track, like it did in my redwood foreste/ravine module that didn't make the move. 

So far I've put together the benchwork on two of the modules. I'll be working away on them as I get the time over the next while. I need to make some legs and I'm thinking I'll make the track level about 125cm (49 inches) off the ground as it seems to be a comfortable height for me. How high did you decide to make your layout? If you started again would you go higher or lower?

Two modules in need of legs... (and some models). 


Friday 24 March 2023

The layout moved by rail...

So we made the move and have been settling into our new home over the last two and half months. This post is about the decommissioning and disassembly of the layout as it was.  

I only brought one (large) piece of the layout with me. In the end, it was a strategic decision. If I only brought half the layout with me, I would have a head start on building some new easily transportable modules and use them with the part of the old layout I brought. That way when I move again, I've got something to take with me and can continue building the new modular version of the Thoroughfare Gap Railroad. In the meantime, I get to run trains and enjoy some of my favourite scenes on the layout for another two years. 

The day before we packed it all down the whole family spent the evening running trains for the last time. Everyone got to run their favourite locomotive with whatever cars they wanted. I enjoyed making up trains and aligning switches and just seeing everyone else enjoying the layout. 

I wanted some sort of ceremony for the last trains on the layout. So I decided to have a special freight train to pull all the cars off the layout and into the fiddle yard. I used three locomotives, one in the lead and two as mid-train helpers. I'd never lashed up three locomotives together but it worked beautifully. No derailments and it looked great. 

Lastly, I ran a special triple-headed 6-car passenger train from Teresaton to the Erewhon Fiddle yard. Again, the trains performed flawlessly and it was a wonderful 'closing ceremony'. 

Then my Dad and I spent two days packing it all up. The first day was devoted to taking everything off the layout, trees, buildings, figures, rolling stock and locomotives and carefully preparing it for transportation. On the second day, we build a big plywood box around the portion of the layout that was going to move. It was awkward, because of the switch throw knobs and bits of scenery that protrude out of the layout's baseboard footprint. The final result was solid but heavy. 

Our movers loaded everything into a shipping container, which was transferred onto rail for the trip up New Zealand's South Island. I enjoyed that the trains travelled on the train. The great thing is that it all arrived intact and is ready for repopulating. 

I've set the layout up in my new space with the buildings, but no figures yet. I've started building the new modules, but more to come on that soon. 


The layout looked very bare before pulling apart the benchwork.


The Redwood forest was carefully packed into two large boxes for separate transport.


I had made a dedicated carrying case for the locomotives. 

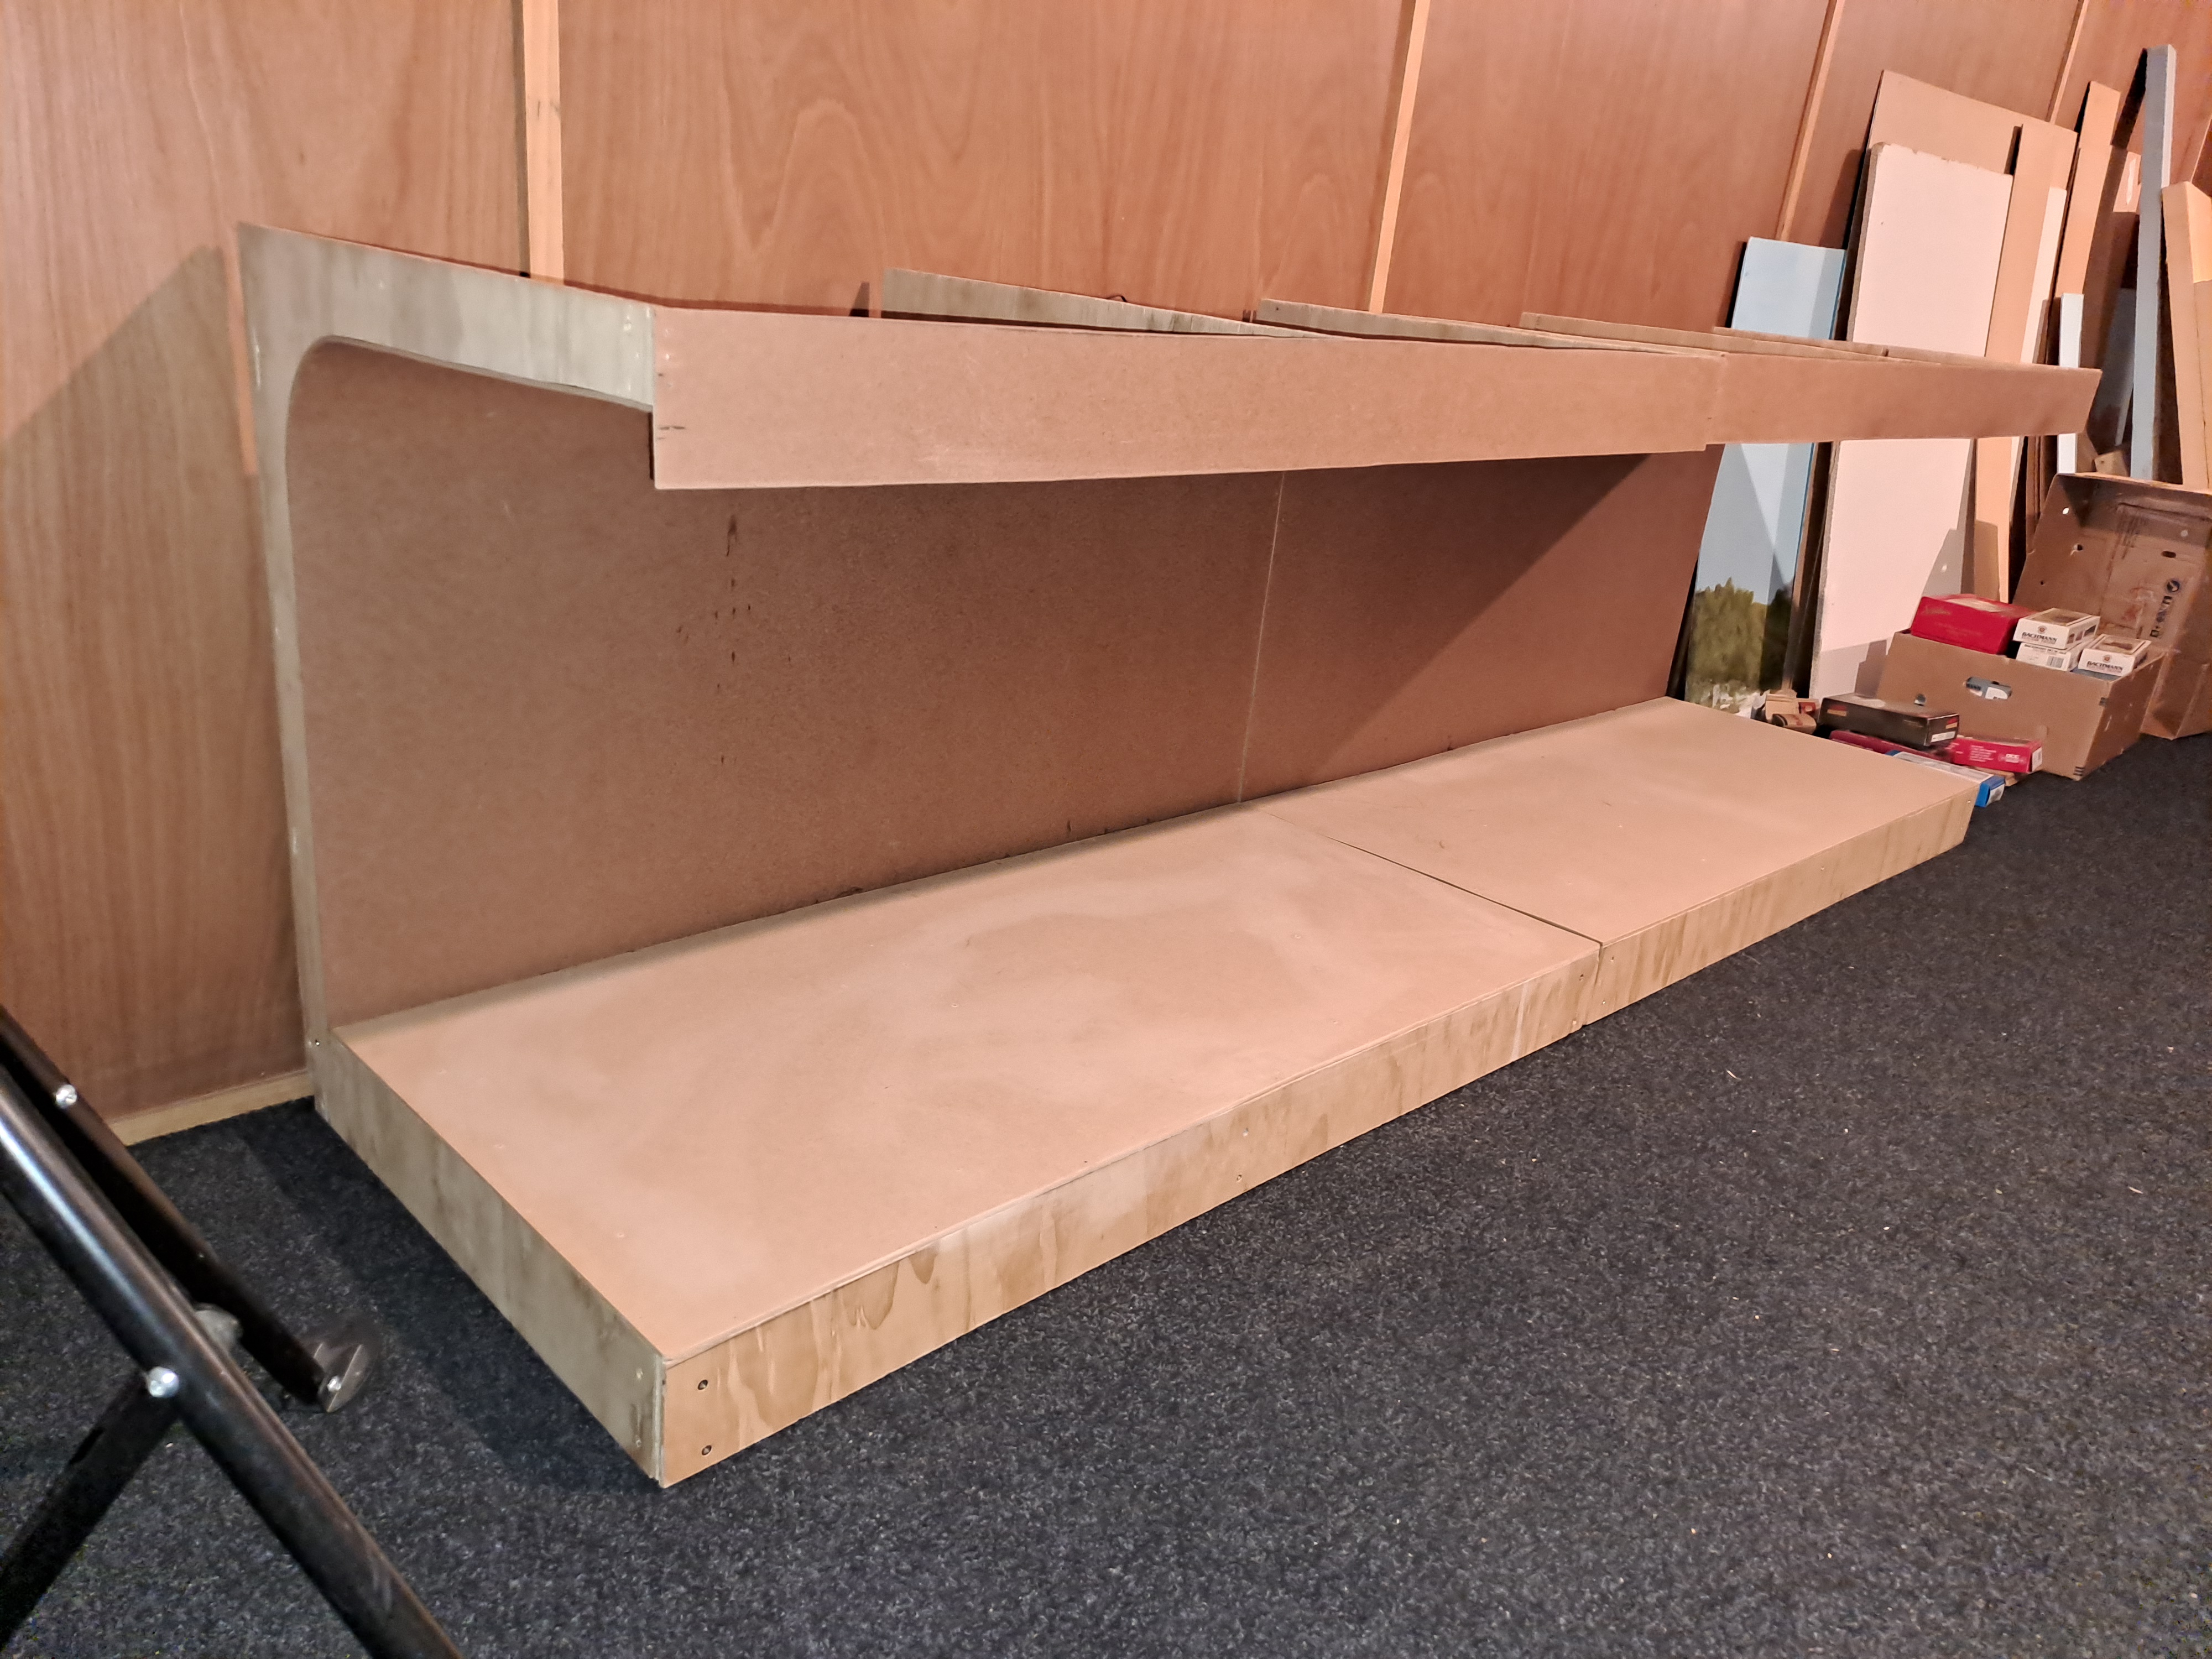
The section of the layout that made the trip. On the ground, with the structural framing built around it. 


The layout is encased in plywood and ready for shipping.

The ravine section was passed on to become a part of another person's layout.